Tuesday, July 10, 2012

Oatmeal Cream Pies


Honestly there isn't much better, or that reminds you more of childhood, than a Little Debbie.

The fudge brownies are my absolute favorite! I will find a recipe one day to recreate those little chocolate jewels. But Oatmeal Cream Pies are definitely a close second.

Thin, moist, oatmeal cookies filled with some sort of marshmallow cream? Yep. Delicious!

Here's my recipe to make them at home. Please note they are messy. So if you want to make these when its say...90 degrees out. There will be marshmallow cream everywhere.

For the Cookies:

1 cup, 2 sticks, unsalted butter
3/4 cup brown sugar
1/2 cup sugar
1 Tablespoon corn syrup (preferably dark)
1 teaspoon vanilla
2 eggs
1 1/2 cups AP flour
1/2 teaspoon salt
1/4 teaspoon cinnamon
1 1/2 cups quick cooking oats

7 oz container marshmallow cream


  1. Preheat the oven to 350 degrees and line your cookie sheet with parchment paper. Line your cooling rack with parchment also, as the cookies will stick.
  2. In the bowl of your stand mixer with the paddle attachment, combine the butter, sugars, corn syrup, vanilla and eggs and beat on medium until creamy.
  3. In a separate bowl, sift together the flour, salt and cinnamon.
  4. Add the dry ingredients to the creamed mixture. Stir in the oats.
  5. Drop tablespoon sized scoops onto your cookie sheet, spacing apart well as they will spread.
  6. Bake for 10-12 minutes until set and starting to brown.
  7. Cool completely. Slather one side with marshmallow cream and sandwich with another cookie.
  8. Enjoy!!!

These are way messy but totally addicting! Feel free to make your own marshmallow fluff to fill the inside... I took the easy route!

Saturday, July 7, 2012

Lindor Truffle Cupcakes


I really considered not even posting these cupcakes because the pictures are a little shotty.

But... I couldn't NOT share this recipe with you all. It's just that good. My ratings of course were based on a bunch of chocolate hungry women... No bias there.

I made them for my coworker's birthday. A good dozen of them. And she was only willing to part with 4. After they hit the lunch room they were gone in a good 10 minutes. Gloating aside, these are some damn good cupcakes.

Make them to impress a crowd or hoard them... either way is fine with me. Also, you can switch out the cupcake, truffle and frosting flavor to meet your tastes; chocolate with caramel truffles and frosting. White chocolate. Cookies and cream. YUM!

For the Cupcakes:
makes around 22-24 cupcakes
(recipe from glorious treats)

2 cups sugar
1 3/4 cups all purpose flour
3/4 cup unsweetened cocoa powder
1 1/2 teaspoons baking powder
1 1/2 teaspoons baking soda
1 teaspoon salt
2 eggs
1 cup whole milk
1/2 cup vegetable oil
2 teaspoons vanilla extract
1 cup boiling water

 Lindt Lindor truffles


  • Line muffin tin with cupcake liners and preheat your oven to 325 degrees.
  • In your stand mixer, combine the sugar, flour, cocoa powder, baking powder/soda and salt. Add in the eggs, milk, vegetable oil and vbanilla and beat on medium for 1 minute. Stir in the boiling water. The batter will be very runny, this is what makes it moist. Fill liners 1/2 to 2/3 full. Careful not to over fill the liners as they will over flow. Bake for 20 minutes or until a toothpick inserted in the center comes out clean.
  • Remove cupcakes immediately from pan and place on wire rack. Unwrap your truffles and cut an X into the top of your cupcake. Push the truffle in the still hot cupcakes unt il the top of the truffle is flush  with the tfop of the cupcake. Let cool completely on the wire rack.


 (Three words: oozy, chocolate-y, deliciousness!!)

Now for the chocolate cream cheese frosting.

You will Need:
1/2 cup, or one stick butter (sitting at room temperature for 10 minutes)
8 oz cream cheese, pulled directly from fridge
1 teaspoon vanilla extract
1/2 cup cocoa powder
4 cups powdered sugar
2-3 tablespoons whole milk


  • Place butter in stand mixer and beat slightly. Add in cream cheese and blend until combined.
  • Add vanilla extract and cocoa powder and blend on low speed for 30 seconds. Start adding the powdered sugar in multiple additions, scraping the sides if need be, then increase to medium speed until fluffy. Slowly add in the milk, a little at a time, until you reach your desired consistency. Pipe immediately onto your cooled cupcakes.


Caution: these cupcakes have intense chocolate flavor. If chocolate ISN'T your thing, stay far far away. From me too... Because who doesn't like chocolate? The cupcakes are moist and the truffle oozes in the middle.... Can you say yum? I can... and it starts with Truffle Cupcakes! Enjoy!

Thursday, July 5, 2012

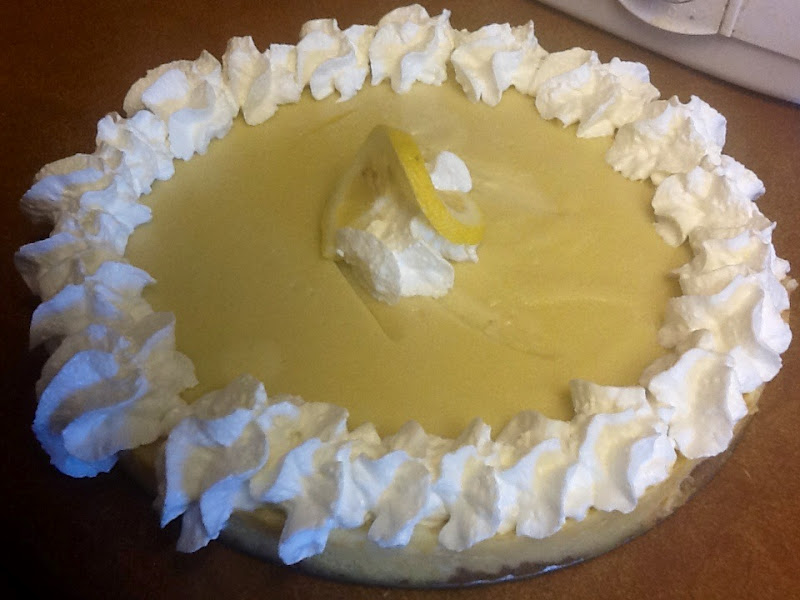
Lemon Icebox Pie


I've never been fond of the saying "when life hands you lemons, make lemonade".

Really? Who drinks lemonade with just lemons? You need water and sugar. Which I translate in life as being tears and love. 

I'm not much of a complainer but this last week and a half has been brutal. Between the flu virus floating around (which I just saw a report on the possibility of it being West Nile Virus... Ummm, I don't THINK SO! Who needs WebMD to terrify you when the news is just as bad).

On top of that my husband had a flat tire and work is crazy. There. Done with complaining. But without a few shed tears and my loving family I'd be in an institution. 

So, I took my lemons and made icebox pie. Talk about melt in your mouth! This is so quick to make and is everything right in the world. I made a meringue to top the pie but it failed... miserably. I can't say I'm surprised after this week. 

Oh well.... It's more than delicious without.

For the Crust:
3 cups Nilla wafers
1/2 cup pecans
6 tablespoons butter

Filling:
6 egg yolks
2 cans sweetened condensed milk
3/4 cup lemon juice

First, make your crust. Place all 3 ingredients into your food processor and pulse until the butter coats the crumbs. Press into a pie pan or 10" spring-form pan. (If using a pie pan, you might have left over filling). 
In your stand mixer, combine the egg yolks and condensed milk at medium speed. Set the mixer to low and slowly pour in your lemon juice. Mix until thick and incorporated. Pour over your crust. 


Now, you can either whip up a meringue to top this or place in the oven at 325 degrees for 25-30 minutes. You will want the filling to be set.
It isn't called an icebox pie for nothin'! After pulling the pie from the oven, let cool completely on a wire rack.
Then place in your refrigerator for 6 hours to over night.
Trust me, it's worth the wait....


Thursday, June 28, 2012

Frozen Hot Chocolate


So, I jump on bandwagons sometimes... Don't judge me.

For example, I'm glad leggings made a classy come back. Now you can wear them with dresses and people don't judge you. I'm just a little sad ruffle socks didn't come back with them.

And maybe I did read all four of the Twilight books and get just a tad bit (OK, a lot) excited about the movies coming out.

And yes I WILL be standing in line this weekend to join the Magic Mike bandwagon.

So to stay true to my bandwagon-ing I had to make frozen hot chocolate.  Seriously, why wouldn't you?

See people, sometimes being a bandwagoneer is a good thing. 

P.S: This tastes JUST like a frosty!

All you need is:
3 packets of hot chocolate mix
1 cup milk
2 cups ice

whipped cream
chocolate shavings/chips


  • Place first 3 ingredients in your blender and combine. 
  • You want it icy, thick and delicious. (Sometimes I describe myself this way to people to see the look on their faces... ha ha I kid.)
  • Top with whipped cream and chocolate and enjoy. Use a spoon, a straw or just chug it. The last one usually causes a brain freeze though so I wouldn't suggest it.


While I drink mine I'm coming up with a way to get "bandwagon-ing" and "bandwagoneer" in the dictionary. Wish me luck!


Tuesday, June 19, 2012

Homemade Buster Bars


I've been lucky enough to grow up near a Dairy Queen most of my life.

The local lunch hang out during my entire High School career was Dairy Queen.

I would always order the same thing... A chicken strip basket and a Blizzard or... a Buster Bar. (Totally calorie free if you were wondering).

I thought of an ingenious way to make them at home (sans chocolate coating because that just sounded like a mess. So if that's up your ally.... more power to ya).

And next time I would probably use Dixie cups and not Styrofoam because peeling them off was kind of a pain.

Honestly though, the sweet and melty vanilla ice cream, mixed with the gooey hot fudge and salty peanuts make it all kind of worth it.

Plus the flavor combinations are endless... How about throwing some Peanut Butter in the middle of these guys!? YUM!

Buster Bars:
(makes 6 using 8-oz cups)
1 quart of your favorite vanilla ice cream
1 jar hot fudge topping
salted peanuts

8 oz Styrofoam or Dixie Cups
Plastic spoons


  1. So! Set your ice cream on the counter so it can become melty (Is this even a word? Most likely not but I've used it twice so I'm sticking to it). 
  2. Place some peanuts into the bottom of your cup (really the top of the ice cream) and dollop a tablespoon of hot fudge onto them. 
  3. Cover with vanilla ice cream, going half way up your cups. Place more peanuts, then hot fudge and cover with more ice cream until the cups are filled. Now gently, with the back of a spoon, press down to compact everything. Stick a plastic spoon square in the middle and freeze.
  4. Continue with the rest of your cups. 
  5. Once hardened peel back your cups and you are left with the perfect "pop". Enjoy right away or dip into chocolate coating for TRUE Buster Bars.


Thursday, June 14, 2012

Maple Bacon Biscuit Donuts


Can I just start off by saying what a crazy week this has been.

You know how last blog I mentioned my son pulling down my camera and breaking it? Well.... Last week he decided the fish bowl would be the perfect place for my iPhone. Needless to say, I'm not only camera-less, but phone-less to boot. Toddlers are great... Right? (It really seems like I pay no attention to my kids huh? But crazy stuff like this happens in 2 seconds flat... really, I swear.)

I also went on a whirlwind trip to San Diego to find my best friend an apartment. That was a success.

And on top of it work has been slammed!

"Waitress? I'll take an order of mundane life with a side of a million dollars please."

So, that's why I've been out of the blogging game for awhile.

I'm back at it with this simple yet DELICIOUS recipe.

I know you are all probably familiar with these biscuit donuts but I am new to it.

It's easy as heck and can be jazzed up with anything you like... Cinnamon and Sugar, Chocolate glaze you name it.

But honestly, whats better than bacon?

You'll Need:
1 can of biscuits
A fancy cutter or I used a bottle cap
Vegetable Oil
2 pieces cooked bacon

And for the Maple Glaze:
1/2 cup powdered sugar
2 teaspoons of milk
1-2 tablespoons maple syrup

Heat your oil over medium high heat. Test one of your "donut" holes to make sure the oil is properly heated.

Cook donuts, for about 3-4 minutes on each side, and until golden brown in color. Place on paper towels to cool.

Meanwhile make your glaze as thick as you like. You might need to add more milk or more powdered sugar depending.

Dip donuts in glaze and place in fridge for 5 minutes. Bring donuts out, dip in the glaze again and sprinkle with cooked bacon.

Enjoy!

The salty and sweet make these delicious and the glaze is fab!


Saturday, June 2, 2012

Milky Way Cookies


What a great time for my toddlers to pull down my camera and throw it onto the floor.

OK maybe it wasn't that dramatic but nevertheless... My camera is kaput :(

I really hope if I shut it off and turn it on 50 times it will magically work again.... It hasn't seemed to work yet.

Anyways, I have been witness to this Rolo cookie craze. I've actually made the Rolo ones. They were delicious. But Rolo's aren't my favorite candy... Milky Ways are. Especially the midnight ones... YUM! I couldn't find the mini Milky Way dark for this but the milk chocolates were MIGHTY FINE.

Plus it's just an excuse for me to make another batch! (Can you not see how delicious that ooey gooey caramel and nougat look!?)

Or you can go to town and use Reese's minis, or white chocolate kisses.... The world is in your hands people!! When do we ever get that opportunity!?

For the Dough:
(makes about 16 cookies)


1 box devils food cake mix
1/3 cup oil
2 eggs
16 milky way mini's


  1. Preheat your oven to 350 degrees.
  2. Combine the cake mix with the oil and eggs. Really put your arms to work to moisten the dough.
  3. Grab about a golf ball sized chunk of dough (we like big cookies) and form a well. Place your milky way inside and seal over it. You will now have a ball.
  4. Place on a cookie sheet lined with parchment and bake for 10 minutes or until slightly flattened and baked thoroughly.
  5. Let cool, dust with powdered sugar.


These cookies are best warm or at room temperature but heck... Anytime is a great time.

Enjoy with a tall glass of milk or make ice cream sandwiches outta them.... YUM!