Monday, January 28, 2013

Sopapilla Cheesecake


My computer is dead y'all... DEAD! I'm totally at work blogging, on my break, because I made all of these amazing recipes and don't have a computer (and I should get paid to blog, right? JK)!  I think its the fan on the computer, but then again I know nothing about computers...

So as to not keep my blog in the dark, I thought I would post a quick one! I hope to be back up and running with a computer soon but please... Make this recipe!

Sopapillas are my FAVORITE dessert!!

And this cheesecake is really nothing like a sopapilla (besides being cinnamon sugar) but it IS delicious!! So it's a sopapilla, churro, cinnamon-sugar, cheesecake :)

You Will Need:
2 cans of Crescent Rolls
2 (8-ounce) packages of cream cheese, softened
1 cup sugar plus 3 Tablespoons
1 teaspoon vanilla
1/4 cup butter, melted
1 Tablespoon cinnamon

Preheat oven to 350 degrees.
Spray a 9x13" baking dish with cooking spray and pop open one can of crescent roll dough. Press into the bottom of your prepared baking dish.

In a large bowl, with a hand mixer, beat the softened cream cheese, 1 cup of sugar, and teaspoon of vanilla over medium speed until combined. Spread over the layer of crescent dough.


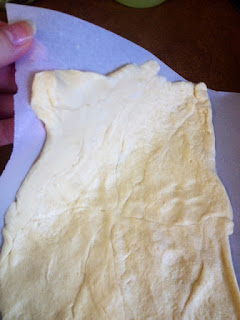
Using a piece of parchment paper, press together the second container of crescent roll dough into a rectangle, the size of your baking dish. Place on the top of the cream cheese layer.
 

Pour and spread your melted butter of the top layer.
Combine the remaining 3 Tablespoons of sugar and the 1 Tablespoon of cinnamon in a small bowl, sprinkle over the top of the melted butter and MASSAGE into the dough.
Place the cheesecake into your preheated oven, on the center rack, and bake for 25-30 minutes or until puffed and firm in the middle.

Remove and let cool slightly before slicing! Enjoy with a nice big scoop of dulce de leche ice cream, any way is amazing but its definitely awesome warm!
 

Thanks for stopping by my blog!

Sunday, January 13, 2013

Carrot Cake Jam


I am obsessing....My new found addictions are scones and jam...

I'm really trying to refrain myself, otherwise my blog would be COVERED in anything scone and jam related. But, do you know what's perfect? They go together! Scones+jam is like Britney Spears and Pop music, or Mark Wahlberg and literally ANY movie he makes in appearance in...it's just meant to be!

I'm devoting one post a month to a jam and scone recipe, at least until I move passed that obsession...

So please share any amazing recipes you might have for either on my blog and I will definitely pin it! I'm ADDICTED I tell you...

Now on to this delicious jam! The recipe is from the blog One Hundred Dollars a Month and I'm beginning to think she shares my jam addiction... I might be adding a few more of her recipes to my repertoire (Hello, Meyer Lemon marmalade!)

Carrot Cake Jam:
(this recipe makes 7-"1/2 pint" or 3.5-"1 pint jars")

1 can (20-ounces) crushed pineapple, with liquid
1 1/2 cups shredded carrot
1 1/2 cups peeled and chopped pears, I used Bartlett
3 Tablespoons fresh lemon juice
1 teaspoon ground cinnamon
1/4 teaspoon freshly grated nutmeg
a pinch of cloves
1 package ( 1 3/4 ounce) powdered fruit pectin
6 1/2 cups granulated sugar

Fill a large pot with water and bring to a boil, remove from heat and place your jars and lids in the water. Let them soak in the boiling water until ready to use.

In a 6-quart sauce pot, combine the first 7 ingredients (up until the cloves). Cook over medium heat until the mixture is to a boil, cover and drop the temperature to low. Simmer for 15 minutes or until the pears are tender. Make sure to stir the mixture occasionally so no sticking occurs. Remove the saucepan from the heat and stir in the pectin.

Bring mixture to a rolling boil, stirring constantly. Slowly stir in the sugar and return to a boil for 1 minute. Stir as to not allow any boil over. While this is boiling remove your jars and lids, using tongs to help you, and turn upside down on a dish towel to dry. Dry them off more by hand if necessary.

When the minute is up, skim off any foam that has formed at the top with a metal spoon. Immediately ladle the jam into the prepared jars and cover and lid them.

Let the jars cool to room temperature before placing in the fridge. If you have a canner, you can drop them in and boil for 10 minutes to seal them. By leaving my jars to cool at room temperature they sealed on their own (to check this, press the middle, if it springs back the jars are not sealed and need to be permanently kept in the fridge, if they are sealed you can store them in a cool place in your cupboard).

The jam is amazing on a toasted English muffin with a light coat of cream cheese! Enjoy!


Saturday, January 12, 2013

Cheddar and Apple Scones


I'm sure I've told you this before, but since my family is from Wisconsin, I love anything cheesy...especially a sense of humor

(I'm not even certain that's why I love cheese, but I need something to blame my addiction on).

Seriously though... Throw cheese on anything and I'll love it. My favorite snack though, as far back as I can remember, was cheese, crackers, and a slice of apple. Something about the crisp-tart apple pairs so well with the sharp cheese.

When I found these scones over at Smitten Kitchen, I knew I had to make them... and then Fall came and went and before I knew it Christmas was over and these STILL hadn't made a guest appearance in my kitchen... Until this weekend!

These are really the ideal Fall treat, but I'm 100% sure these scones will be reappearing throughout the year. The scones have a crunchy sugar top which is an amazing addition to the mild cheese flavor and has just a hint of sweetly baked apple coming through. Plus this scone recipe is perfect... flaky, buttery, heaven!

They are truly addicting... I may or may not have eaten 2 in 10 minutes (please go with me here and assume I may not have...)

Cheddar-Apple Scones:
(makes 8 generous scones)

2 firm apples (I used Gala but a green apple would do well)
1 1/2 cups all-purpose flour
1/4 cup sugar plus 1 1/2 Tablespoons for sprinkling
1 1/2 teaspoons baking powder
1/2 teaspoon salt plus a pinch for your egg wash
6 Tablespoons unsalted butter, cut into 1/2 inch cubes and chilled
1/2 cup sharp cheddar, shredded (I opted for yellow for a pop of color)
1/4 cup heavy cream
2 large eggs

Position a rack in the center of your oven and preheat to 375 degrees. Line a large baking sheet with parchment paper.

Peel and core your apples and cut into large chunks, about one-sixteenth in size. Place the cut apples in a single layer on your lined baking sheet and bake until they take on a little color and feel try to the touch, around 20 minutes. Let them cool completely by placing in the fridge while you continue.

In a large bowl, whisk together the flour, sugar, baking power and salt. Set aside. In the bowl of your stand mixer, fitted with the paddle attachment, place the chilled butter, cooled apple chunks, cheese, cream and one egg. Sprinkle the flour mixture over the top and mix on medium-low speed just until the dough comes together. Do not over-mix.

Generously flour your work surface and place the scone dough on top of it. Sprinkle the top with flour and form into a 6-inch circle that is about 1 inch thick.


Cut the circle into 8 even wedges. Cover your baking sheet with a fresh piece of parchment and transfer the wedges to the baking sheet. Leave about 2 inches between each scone.

Beat the remaining egg and pinch of salt in a small bowl and brush the scones with the egg wash and sprinkle them with the remaining Tablespoon and a half of sugar.


Bake the scones in your preheated 375 degree oven for 25-30 minutes or until firm and golden. Transfer the scones to a wire rack and cool for 10 minutes before devouring!

Enjoy the scones warm with cinnamon-butter or apple butter! Delicious!


Sunday, January 6, 2013

Iced Oatmeal Cookies (like Mothers)


Well the New Year is upon us and I hope you all had a safe and happy holiday.

I have to say, I'm really looking forward to 2013. I'm not sure if it's the promise of new things, or a chance to change what I didn't like about last year, but I'm really hopeful that this year is going to be great!

On top of all of that, I really want to devote time this year to making my blog amazing. Since 2012 was really my first full year blogging, it was kind of a trial run. And I have to say thank you so much to everyone who started following and commenting on my blog, I wouldn't be half the blogger I am today without all of you!

And yes, I know I've made some mistakes and have shotty photography, but I'm still learning.

Another new thing, is that I FINALLY have a Facebook page for my blog. I'm really going to try and stay on top of it by linking my posts as well as a few others I find amazing! If you could take a second and go and "like" my page, I would be truly grateful:


Now on to this delicious recipe. I found it over at the Novice Chef blog  (I'm kind of obsessed with her). These taste really similar to the Mothers cookies we all know and love and I think nutmeg and oatmeal pair so well together!

Enjoy!

Cookie Dough:
(This recipe made about 22 fairly large cookies)

2 cups old fashioned oats
2 cups all-purpose flour
1 Tablespoons baking powder
1 teaspoon baking soda
2 teaspoons cinnamon
1 teaspoon freshly ground nutmeg
1 teaspoon salt
2 sticks unsalted butter, melted
1 cup granulated sugar
1/2 cup light brown sugar, packed
2 large eggs

Frosting:
1 cup powdered sugar
3 Tablespoons whole milk
1/2 teaspoon vanilla

Preheat oven to 350 degrees and generously grease your cookie sheet (use butter or a good amount of cooking spray to help the cookies spread).

In a chopper, food processor or even your coffee grinder (cleaned of course) pulse the 2 cups of oats to a coarse meal, you do not want to go as far as a fine powder. Dump into a large bowl and add the flour, baking powder/soda, cinnamon, nutmeg and salt. Mix and set aside.

In the bowl of your stand mixer, combine the melted butter, granulated sugar and brown sugar. Beat on medium until the sugars are combined and the mixture is creamy. Add in the eggs, one at a time. Next, drop your oat/flour mix into the butter mixture and beat until thoroughly combined.

Place heaping Tablespoon fulls onto your prepared cookie sheets and bake, for 14 minutes or until golden, turning the pan half way through baking.

Let the cookies cool for a couple of minutes on the cookie sheets before transferring to a cooling rack. Let cool completely before frosting.

Mix your frosting ingredients together in a small bowl. Take the cooled cookies and dunk the tops into the frosting. Continue until all of the cookies are frosted and set aside to harden.

Enjoy this crisp oatmeal cookies with coffee... mmmm!


Monday, December 31, 2012

New York Cheesecake


I honestly can't believe that 2012 is coming to an end. Wasn't it just Summer?

But as with anything, I'm ready for the possibility of new beginnings. I have to think that 2013 will offer some kind of surprises, let's just hope they're good.

What I miss the MOST about New Years Eve tho? Getting all dressed up in sparkly attire and drinking 1 too many glasses of champagne (OK, more like 5 too many). This year I'm making Mexican Pizzas, snuggling with my boys and gluing my eyes open in hopes I'll see midnight.

It's probably too late to make this Cheesecake for your party tonight but trust me, make it anyways. I had planned to make a strawberry sauce to top it, but half of the cheesecake was gone before I even pulled them out of the fridge (it's THAT good).

Happy New Year everyone! See you in 2013...

(Recipe adapted from Smitten Kitchen)


For the Crust:
15 Original flavored graham crackers, made into crumbs using your food processor
1 stick salted butter, melted
1/2 cup sugar

 Cheesecake Filling:
5 (8-ounce) packages cream cheese, softened
1 3/4 cups sugar
3 Tablespoons flour
Zest of a small orange
Zest of a small lemon
1 teaspoon vanilla
5 large eggs
2 large egg yolks

Preheat oven to 500 degrees and grease a 9-inch spring-form pan (a smaller spring-form is fine here if you are looking for a taller cheesecake).

In a large bowl combine graham cracker crumbs, butter and sugar. Stirring until the crumbs are moist. Press into the bottom and up the sides of your pan (I used a cup to help evenly press).

Place in your preheated oven for 2-3 minutes, just to set up. Set aside while you prepare the filling.

In the bowl of your stand mixer, combine the cream cheese, sugar, flour, and vanilla until smooth. Make sure to scrape down the sides when needed. Add in the vanilla and mix to incorporate. Add in the eggs, one at a time and continue scraping down the sides. Then add in the egg yolks and mix until smooth.

Place the spring form pan on a large cookie sheet and pour the filling into the prepared crust. Bake in the 500 degree oven for 5-10 minutes, carefully watching so the top does not get too brown. As soon as it is lightly browned, lower the oven temp to 200 degrees and bake until the edges are set yet the middle is still slightly jiggly, this takes about an hour more.

Remove the pan from the oven and cool completely on a wire rack, remove the sides of the spring-form pan, cover the cheesecake with plastic wrap and cool in the fridge until set, a minimum of 6 hours.

Serve plain or enjoy with a berry sauce.


I love the way the lemon and orange zest come through in the cheesecake!

Happy New Years Eve everyone... Get in those Midnight kisses! (The champagne masks the cheesecake breath) :)


Tuesday, December 25, 2012

Homemade Bear Claws with Honey Glaze (100th blog post!)


Merry Christmas Everyone! I'm going to chalk it up and say this is probably one of THE best Christmases I've had!

My boys are going through the Spider-Man phase, which makes shopping a lot easier for Santa, but watching how THANKFUL they were for all of their presents was the best gift I could ask for!

The second best gift? These Bear claws... Oh. Em. Gee.

I really don't think I imagined just how delicious they would be... They have a croissant-like dough, with almond paste filling and a honey glaze... are you sold yet? Good, because I don't know what else I could do to change your mind.

There will be lots of pictures in this blog so you can see the steps. I actually made the dough on Sunday, Monday I formed the Bear Claws and today just popped them in the oven. Taking a couple of days for each stepped really helped me NOT feel overwhelmed, but if you have a lot of time in the day, try these all at once...you wont regret it!


For the Pastry Dough:
3 1/2 cups all purpose flour (plus more for dusting)
3 sticks unsalted butter, chilled
2 packages active dry yeast
1/2 cup warm water (105-115 degrees)
1/2 cup heavy cream
1/2 teaspoon salt
2 eggs at room temperature
1/4 cup sugar


  1. Add flour to the bowl of your food processor. Cut the butter into 1/4 inch slices and add to the flour. Pulse until the butter is about the size of kidney beans. 
  2. In a large bowl, dissolve your yeast in the warm water. Let stand for 5 minutes (or until bubbly). Stir in the cream, salt, eggs and sugar. Turn your butter/flour mixture into the large bowl that holds the cream mixture and mix with a rubber spatula until the dry ingredients are just moistened. Using your hands, form a ball out of the dough and wrap tightly in plastic wrap. Refrigerate for a minimum of 4 hours or up to 4 days. 
  3. Turn the dough ball out onto a lightly floured surface. Dust the top with flour. Pound dough with a rolling pin.

Roll out the dough to form a 16x20-inch rectangle. Fold the rectangle into thirds.


(Can you see the large pieces of butter?)

Turn your folded dough and roll out, again, to a 16x20-inch rectangle. Fold again into thirds. Place your folded dough in the refrigerator for 30 minutes while you get started on the filling. 

Cinnamon Filling:
1 egg white
1-8 oz can of Almond Paste (I used Solo brand)
3/4 cup powdered sugar
1 teaspoon cinnamon

  1. In a small bowl, beat all of the ingredients with an electric mixer until very smooth. Cover and place in the refrigerator until ready to use.

Assembly:
1 egg, beaten
Sliced Almonds
Turbinado Sugar

On a lightly floured surface, roll out the chilled dough to this time make a 16x18-inch rectangle. Cut lengthwise into 4 strips.

Remove filling from the fridge and spread 3 Tablespoons of filling down the center of each strip.

Roll each strip from the long side, jelly-roll style, and place seam side down. Roll lightly to seal the edges.


The rolls will take on a more rectangular shape. Cut each strip into 4-6" pieces, depending on how large you want your Claws to be, mine were 6-inches. Cut 3-5 slits for the "toes" and place the pieces on to a baking sheet covered with parchment, curving them slightly. By cutting them into 6-inch pieces, I got exactly 12 Bear Claws. Smaller ones will of course produce more.


Allow claws to rise in a warm place for 20 minutes or until puffy. At this point you can cover them with plastic wrap and refrigerate until needed (if you decide to refrigerate them, let them stand at room temp until puffy).

Preheat the oven to 400 degrees. Brush the bear claws with the beaten egg, place a sliced almond on each bear "toe" and sprinkle with the turbinado sugar. 


If making 4-inch claws, bake for 5-8 minutes and for the 6-inch claws bake for 10-12 minutes or until golden in color. Let cool slightly on wire racks.

Glaze:
1 cup powdered sugar
2 Tablespoons Honey
2 Tablespoons milk


  1. Stir together the ingredients until smooth, add more or less                                                                                                                                                            milk/sugar to your desired consistency (you want a slightly runny glaze).
  2. Drizzle over slightly cooled pastries.


These pastries are best enjoyed warm but oh my WORD are they amazing any time! Oh, and by the way, this is my 100th blog post! I can't believe it, I am so thankful for the love and support my little blog has received! Thank you everyone :)

Recipe adapted from Sprinkle Bakes... Check out her blog AND book, not only is she an amazing bake-tress but her pictures are to die for!

Sunday, December 16, 2012

Banana Coffee Cake


In light of Friday's events, I am going to keep this short and sweet. Also, because I can't seem to break away from holding my boys for longer than 3 minutes...

Only 9 days left until Christmas now! And just in case you still haven't decided what to make for breakfast for the little ones (and Santa!) here is a great idea.

Everything comes together fairly quickly and you could even throw everything together and toss it in the fridge Christmas Eve and simply bake it in the morning. Whatever your floats your boat.

Oh and also... Would you take a second and follow my blog on Instagram? I'm just starting out, so there are only a few pictures up, but I will add more... promise. Here is the link:

http://instagram.com/morningnoonight/

Happy Sunday everyone. Make sure to hold your kids close this week (and every week). Love you all!

For the Cake:
2 cups all-purpose flour
1 teaspoon baking soda
1 teaspoon baking powder
1/2 teaspoon salt
1/2 cup unsalted butter, softened
1/2 cup sugar
2 eggs
1 teaspoon vanilla extract
1 cup mashed banana (about 2 large)
1/2 cup whole milk

For the Crumb Topping:
1/2 cup all-purpose flour
1/2 cup packed light brown sugar
1 teaspoon ground cinnamon
6 Tablespoons cold butter in chunks

Preheat oven to 350 degrees and grease a 9" round cake pan.

Combine flour, baking soda, baking powder and salt in a medium bowl and set aside. In a large bowl, cream together the butter and sugar. Add eggs in, one at a time. Mix in the vanilla and mashed bananas until well blended.
Add the flour mixture into the butter-banana mixture, alternating with the milk. Make sure you end with the flour mixture. Beat until smooth and pour into the prepared pan.

For the topping, combine flour, brown sugar, and cinnamon in a small bowl. Using a pastry cutter or your hands, cut in the butter until crumbly (I like larger pieces of butter here). Sprinkle the topping over your cake batter and place in the oven for 35-40 minutes or until a toothpick inserted in the center comes out clean.

Enjoy! (Is it bad that I turn into Gwen Stefani every-time I spell bananas!?)